Payments & settings
Payments & settings
Connect Xendit payment links, offer bank transfer, and set delivery rates, pickup addresses, order rules, reminders and invoice details, each on its own page.
Commerce → Settings opens its own menu in the sidebar, with one page per topic. Commerce settings at the top of the menu takes you back. Only owners and admins can change these pages; members see them read-only.
| Group | Page | What it holds |
|---|---|---|
| Payments | Online payments | Xendit: the connection, your balance and the webhook. |
| Bank transfer | Your bank and e-wallet accounts. | |
| Shipping | Delivery rates | Your rates, store pickup and live courier rates. |
| Pickup addresses | Where couriers collect your orders. | |
| Orders | Order rules | Numbering, payment link validity and AI ordering. |
| Reminders & alerts | The payment reminder, abandoned orders and your low-stock threshold. | |
| Invoices & receipts | The business details on your documents. |
You can offer Xendit payment links, manual bank transfer, or both. Orders can't be created until at least one is set up.
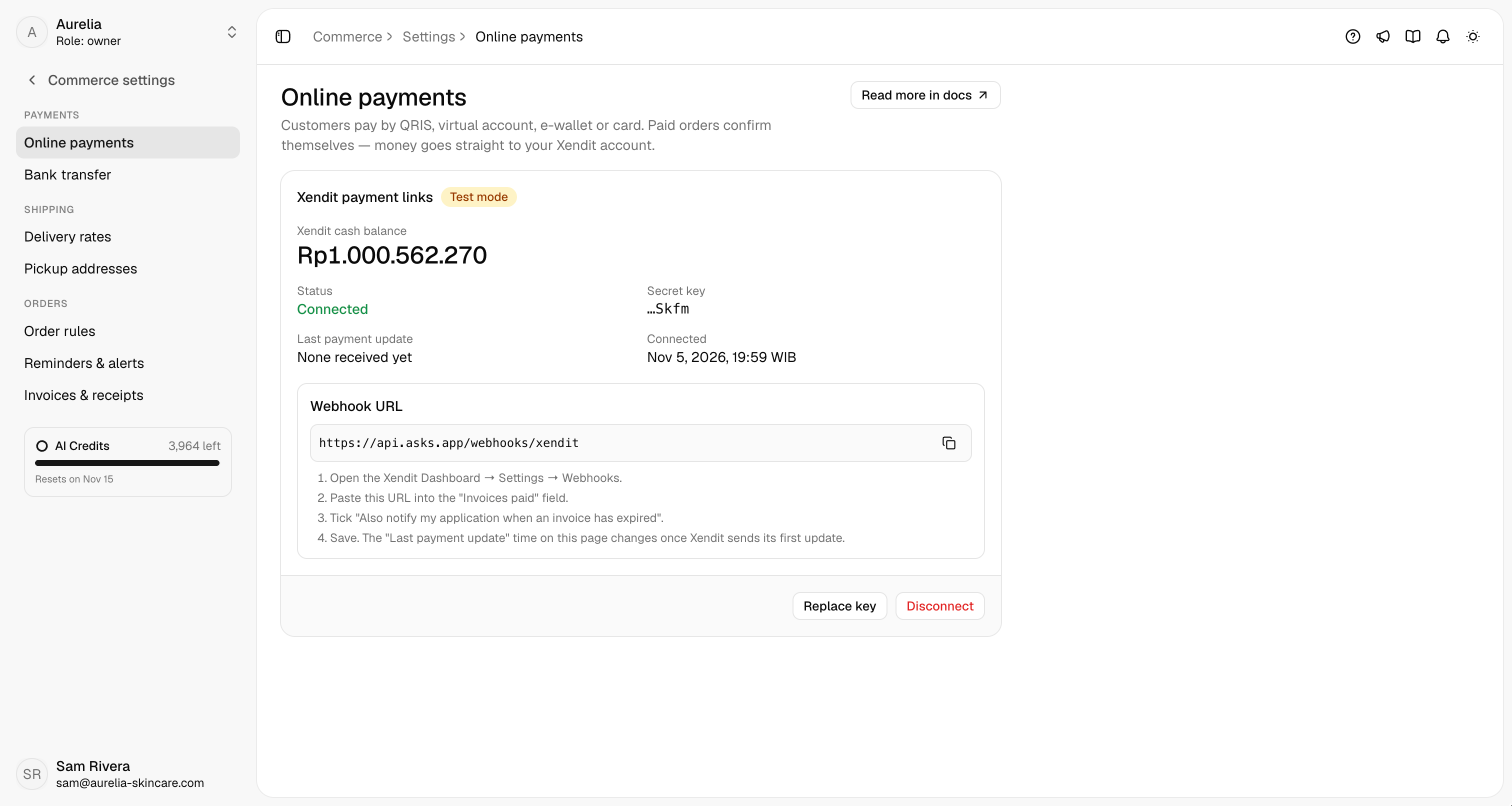
Connect Xendit
With Xendit, customers pay by QRIS, virtual account, e-wallet or card on Xendit's payment page. The money goes straight to your own Xendit account, and paid orders confirm themselves.
In the Xendit Dashboard, go to Settings → API keys and create a secret key with Money-in write permission. Add Balance read to see your Xendit cash balance on this page. A development key (xnd_development_…) connects in Test mode; a production key (xnd_production_…) connects as Live.
In Xendit, go to Settings → Webhooks and copy the webhook verification token.
On Online payments, paste the Secret key and the Webhook verification token, then click Connect Xendit. Asks checks the key with Xendit before saving it. Both values are encrypted and never shown again; only the key's last 4 characters are.
Copy the Webhook URL, https://api.asks.app/webhooks/xendit. In Xendit's Settings → Webhooks, paste it into the Invoices paid field, tick Also notify my application when an invoice has expired, and save.
Verify it works — Last payment update shows the time of the latest update from Xendit. After the first order is paid or its link expires, it changes from None received yet to a time. If an order stays unpaid after the customer paid, check the webhook URL in Xendit, then open the order and click Check payment status.
Replace key swaps the key and token. Disconnect stops new orders from getting payment links until you reconnect; links already sent keep working, and their payments are still recorded. The status reads Connected, Pending, Key rejected or Disconnected.
How payments are confirmed
- A Xendit order becomes paid only from Xendit's own notification, which Asks verifies with your webhook verification token, or from Asks checking the link with Xendit. Asks checks unpaid links regularly, and Check payment status on an order checks at once.
- A bank-transfer order becomes paid only when an owner or admin clicks Mark as paid.
- A customer's message, a screenshot of a transfer, or the AI agent never marks an order paid.
- A payment for the wrong amount, a second payment, or a payment after cancelling puts the order in Needs review instead.
Manual bank transfer
On Bank transfer, turn on Offer manual transfer and click Add account for up to 5 accounts, each with the Bank or e-wallet, the Account number and the Account holder. Manual transfer is offered only once an account exists. Customers get these details with their order, on their invoice and in the payment reminder. When the customer sends a transfer receipt, attach it to the order as a payment proof. When the money arrives in your account, open the order and click Mark as paid: the order moves to Processing, the stock is deducted, and the timeline records who confirmed it.
Order settings
On Order rules:
| Setting | Default | Details |
|---|---|---|
| Order number prefix | ORD | 1–10 capital letters or digits, starting with a letter. Orders are numbered ORD-00001, ORD-00002 and so on; a new prefix applies to new orders. |
| Payment link valid for (minutes) | 1440 (24 hours) | Between 15 minutes and 7 days (10080). Unpaid stock is held until the link expires. |
| Let the AI agent create orders | On | The agent confirms items, shipping and the total with the customer, then creates the order and sends the payment link. See Orders in chat. |
Related
- Shipping — your rates, store pickup and live courier rates.
- Orders — marking orders paid and reviewing payments.
- Invoices & receipts — the business details on your invoices.
- Commerce — availability and setup.